

Using LED String Lights to Illuminate Pumpkins
By Hagan Schmidt, COO & Lighting Expert – 11/24/15

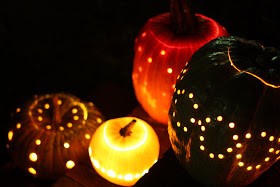
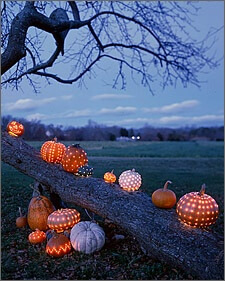
It’s time to fright and delight this Halloween! These LED string light pumpkins are sure to do just that! With the right lighting and a little creativity, you can transform an ordinary carved pumpkin into something extraordinary! Using LED lighting inside your pumpkins is safer than a traditional tea-light candle. LED string lights completely eliminate the worry of something catching fire. LED lights also ensure those poking little fingers don’t get burned! One thing kids love, is to do exactly what you tell them not too. Since LED bulbs don’t get hot, they can poke and prod their lit masterpiece as much as their little hearts desire. Supplies needed: Pumpkin of your choice LED string lights Drill and drill bits Large knife, a pen and push pins (optional)

Choosing your lighting: The lighting you choose for your pumpkin is ultimately the most important part. It can accent a beautiful pumpkin or cast an eerie glow as a witch flies past the moon. LED string lights come in a variety of colors and styles. My personal favorite is the LED string light raspberries. You could also choose to use regular LED string lights which look awesome too. As for color, it all depends on what you envision for your end result. Red or purple LED string lights look great accenting spooky décor. Preparing your pumpkin: After you have chosen the perfect pumpkin you will need to cut a hole in the bottom of your pumpkin. Make sure the opening is big enough to easily clean your pumpkin. Also, slant the knife when you cut so you can easily replace the bottom. Once you have the hole cut, it’s time to clean out the insides. I like to separate the seeds into a different bowl to bake pumpkin seeds. I use a melon baller to scrape the walls of the pumpkin, but a spoon does the trick as well.

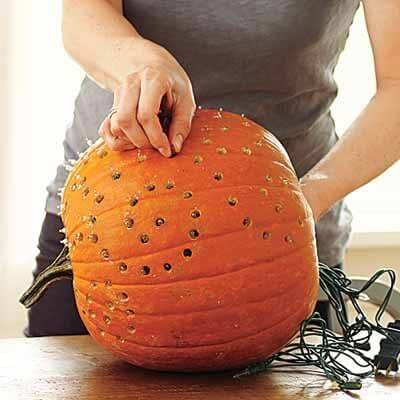
Marking and Drilling your pumpkin: Now that your pumpkin is nice and clean, it’s time to get creative! Chose a template or design that you want to display on your pumpkin. If you are going to chose a template provided in a pumpkin carving kit it is advisable to only “drill” the outline. You can still carve the more detailed aspects of your pumpkin if you wish. Once you’ve chosen your design transfer it onto the pumpkin using a pen. After you’ve transferred or drawn a design on your pumpkin, grab your drill! Choose a drill bit that is slightly larger than the LED string lights you have chosen. You can also use more than one size drill bit to create your design. Now, power up that drill and create the desired holes. After your design is complete, cut a small square hole in the back (bottom) side of the pumpkin to run your LED string lights out.
Adding the LED String Lights: Insert your LED string lights through the large hole in the bottom of your pumpkin. Push each light through a hole, starting at the top of your design. You can use push pins (like the ones on a corkboard) to pin the wires to the wall of your pumpkin. This is especially helpful in hiding the wires if you have chosen to carve some details of your pumpkin. It also helps spread out any remaining unused bulbs. Please use caution when pinning the wires so you don’t accidentally puncture the wire. After all of your lights are in place, run the power cord through the small square hole in the back. You can now put the bottom piece of your pumpkin back in place. Plug in your LED String Light Pumpkin and Enjoy! We would love to see your finished projects! Please take a moment and post them on our Facebook page! Happy Halloween!
™